Citrix Storefront 2.5 and Single Sign on:
 With the release of XenDesktop / XenApp 7.5, Citrix Storefront has brought back a very sought after feature, Single sign on for local credentials to the storefront site!
Citrix Storefront SSO can be the default configuration or a choice can be given to the user if you select more than one authentication type as below:
Desktop appliance site: (Slight deviation, bear with me).
An interesting addition to storefront in 2.5 is a desktop appliance site is installed by default. Richard covers what a desktop appliance site really well in this article for the current release of storefont here. It’s worth noting the desktop appliance site is running the older storefront code base and does not currently support single sign on, strangely.
Back on topic!
Below is a quick guide on how to get it working and any interesting features along the way, I’ve broken this piece down into three parts:
XenDesktop Delivery controller configuration:
on each delivery controller accessible by the storefront site, run the following two commands:

Client Configuration:
(Shawn Bass did alot of the hardwork here for me, so a thank you for that!)
when installing the client, you can enable the single sign on features with the following command line:
CitrixReceiver.exe /includeSSON /ENABLE_SSON=Yes /silent STORE0="Store;https://yourservername.yourdomain.com/Citrix/Store/discovery;on;Store"
Once this is complete, add the storefront url to the trusted sites for the user, then add the following setting to the trusted sites zone:
Once complete, open group policy on the local machine (or active directory group policy) and import the icaclient.adm file, the typical path is below for convenience:
x86:
C:\Program Files\Citrix\ICA Client\Configuration\icaclient.adm
x64:
C:\Program Files (x86)\Citrix\ICA Client\Configuration\icaclient.adm
Once you have imported this adm file, configure the following values in the LOCAL MACHINE configuration*
*the policies dont work in user mode, oddly.
Configure the authentication policy:
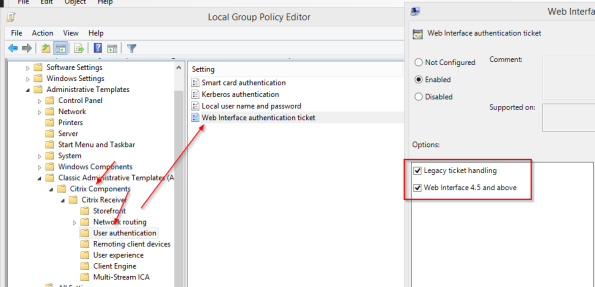
Configure the web interface authentication ticket settings also:
Now reboot the machine and log in, ensuring SSONSVR.exe is running in task manager.
Storefront Configuration:
I’m going to go ahead and assume you’ve already installed storefront, so lets start from there.
Make your way down to the ‘Authentication’ tab choose add/remove methods and select domain pass-through as an authentication type:

Note the warning, the receiver for web will also need some configuration, so that’s our next step:
Make your way down to your ‘receiver for web’ tab and select ‘Choose Authentication Methods’:
As you can see above, domain pass-through is now an option, with a nice little warning:
Note: if you don’t want SSO to be optional, don’t publish additional authentication types on this storeweb.
Testing:
The quickest way to test is to go right ahead now and use the storefront in anger, but if you’re the cautious type Storefront 2.5 includes a subdirectory called DomainPassthroughAuth/test.aspx. if you browse to this site from a configured machine, you should see the following screen.
if you are prompted as below, or see any of the following errors, go back a few steps and check what you missed:
and the following error’s mean you’ve gotten the configuration wrong on the client side:
and that’s it, happy sso’ing!


Hi Andy, Thanks so much for this article. Installing it as we speak in a production environment and this helps a lot!
App Controller 2.10 and SF 2.5 don’t seem to play well together. Can’t aggregate AppC with SF, just get this in the event log:
An error occurred while attempting to write information to the Citrix servers: Unable to write data to the transport connection: An existing connection was forcibly closed by the remote host.. This message was reported from the XML Service at address https://appcontroller.lab.local:443/scripts/wpnbr.dll [NFuseProtocol.TRequestAppData]. The specified Citrix XML Service could not be contacted and has been temporarily removed from the list of active services.
Great, thank you for this article
When I access an application via receiver web. It prompts me to login to windows server and after logging in the app will launch. If I remove the Domain pass-through then it launches properly. I tested the DomainPassthroughAuth/test.aspx and got the windows authentication.
Not sure why it prompts to login in again. Do you know what the issue might be?
This is our test lab and we are not using https
Any feedback would be greatly appreciate it
Check ssonsvr is running on the local machine.
That’s it. For some reason ssonsrv.exe wasn’t running. Thanks for your help
ReceiverWeb Works fin! But for me Receiver Local not get SSON Work 😦
To folllowup on JD’s comment, it seems that SSO (domain passthrough) only works for the Receiver for Web site on StoreFront (in other words, when using a browser rather than the native interface for the locally installed Citrix Receiver).
Andrew, do you have a definitive answer on that?